


How to setup Octane with Laravel? Explained with Example. How to setup supervisor?
Laravel Octane is a high-performance web framework built on top of Laravel that provides an optimised environment for building fast, scalable web app.


Here's a step-by-step guide to setting up Laravel Octane with an example:
- Install Laravel: To install Laravel, you will need to have Composer installed on your system. You can install it by running the following command:
composer create-project --prefer-dist laravel/laravel my-project
- Install Laravel Octane: To install Laravel Octane, you will need to have Laravel's composer package manager installed on your system. You can install Laravel Octane by running the following command in your terminal:
composer create-project --prefer-dist laravel/octane my-app
- Create a Route: Next, you'll create a basic route in your application. You can do this by opening the
routes/web.phpfile and adding the following code:
<?php

use Laravel\Octane\Http\Controllers\ExampleController;

Route::get('/', [ExampleController::class, 'index']);
- Create a Controller: In the previous step, you created a route that points to an
ExampleController. You'll now create that controller. Run the following command to create it:
php artisan make:controller ExampleController
- Add a View: Now that you have a controller, you'll create a view for the index page. You can do this by creating a file named
index.blade.phpin theresources/viewsdirectory and adding the following code:
<h1>Hello World!</h1>
- Update the Controller: Finally, you'll update the
ExampleControllerto return the view you just created. You can do this by opening theapp/Http/Controllers/ExampleController.phpfile and adding the following code:
<?php

namespace App\Http\Controllers;

use Illuminate\View\View;

class ExampleController
{
    public function index(): View
    {
        return view('index');
    }
}
Now, if you run your Laravel Octane application and navigate to http://localhost:8000, you should see the "Hello World!" message.
Next, let's look at how you can set up automation using supervisor.
- Install Supervisor: To install supervisor on a Linux system, you can run the following command:
sudo apt-get install supervisor
- Create a Configuration File: Next, you'll create a configuration file for your Laravel Octane application. This file will be used by supervisor to start and manage your application. You can create a configuration file by running the following command:
sudo nano /etc/supervisor/conf.d/laravel-octane.conf
- Configure the File: In the file you just created, add the following code:
[program:laravel-octane]
process_name=%(program_name)s_%(process_num)02d
command=php /path/to/your/app/artisan serve --port=8000
autostart=true
autorestart=true
user=www-data
numprocs=1
redirect_stderr=true
stdout_logfile=/var/log/supervisor/laravel-octane.log
- Restart Supervisor: You can restart Supervisor by running the following command:
sudo supervisorctl reload
- Check the status of the worker: You can check the status of the worker by running the following command:
sudo supervisorctl status
With these steps, you should have a working example of Laravel Octane and have set up automation using Supervisor.
To check the Benchmark of Laravel with Octane Application:
To check the benchmark of a Laravel worker, you can use the `wrk` tool, which is a high-performance HTTP benchmarking tool. `wrk` allows you to send multiple requests to a web server and measure the response time. Here's a step-by-step guide to check the benchmark using `wrk` :
- Install `
wrk`: To install `wrk`, you can follow the instructions on the `wrk`GitHub page. On most Linux distributions, you can install `wrk`using the package manager. For example, on Ubuntu, you can run the following command to install `wrk`:
sudo apt-get install wrk
- Run `
wrk`: To run `wrk`, you can use the following command, replacinghttp://localhost:8000with the URL of your Laravel worker:
wrk -t12 -c400 -d30s http://localhost:8000
- Analyze the results: After `
wrk`has finished running, it will display the results, including the number of requests per second, the average latency, and the number of errors. You can use these results to determine the performance of your Laravel worker and identify any areas that need improvement.
By using the `wrk` tool, you can easily check the benchmark of your Laravel worker and measure its performance.
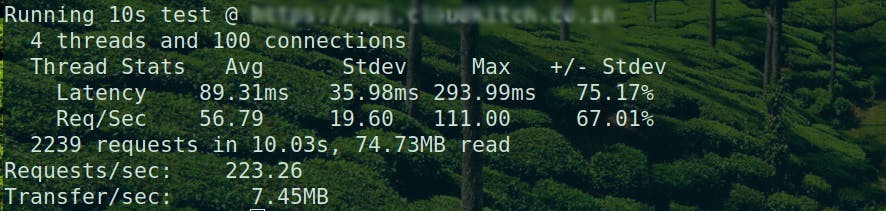
Let’s see how Laravel Octane and Nginx + PHP-FPM
Laravel over Nginx + PHP-FPM
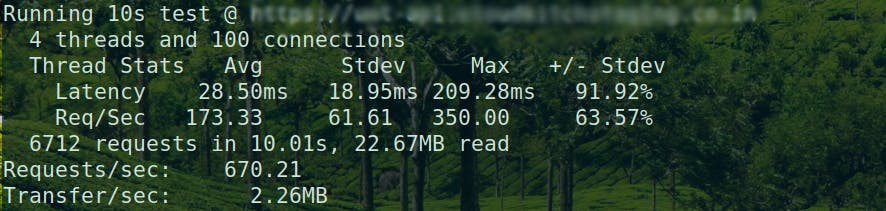
Laravel + Octane
I'm excited about the future of Octane! Are you?
For more information on Laravel Octane, check out its official documentation